Cowboy Soup Recipe For Canning
Makes 7 Quarts – Easy Recipe For Beginner Canners
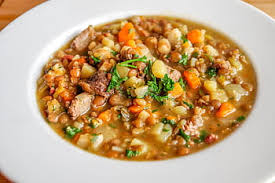
Cowboy Soup Recipe For Canning. I could not believe how easy this recipe was to make. Between chopping, browning the meat and simmering the soup for 30 minutes, the entire recipe was ready to divide among the canning jars in under an hour. And if you like a bit of a bite to your soups, then don’t skimp on the chili’s or spices. So check out the recipe – I’m sure you’ll like it too. Happy Canning 🙂
If you grow your own vegetables, grow your own fruit, or raise your own livestock, then I’m sure you already know of the rewards and benefits of having homegrown food at your fingertips. But what if you’re just getting started and are looking for ways to preserve every bit of produce you’ve toiled over the past spring, summer, and fall? If this is you (and it was me) then you have to check out this easy to make Cowboy Soup Recipe For Canning. It’s so easy even a beginner canner will nail it.
Cowboy Soup for Canning
Makes 7 Quarts
Ingredients
3 lbs Ground Beef, browned and drained well
2 Green Pepper – chopped
2 Garlic clove – chopped
2 Onion – chopped
2 – 15 oz can Diced Tomatoes or 2 pints of home canned
2 – 10 oz can mild or hot Rotel or 1 pint of home canned
4 c Corn Kernels
4 c Kidney Beans (soaked)
2 c mild Green chili’s
8 c Beef Stock/broth
1 tbls Chili Powder
6 Potatoes, peeled and diced into small cubes
2 tsp Salt
1 tsp Black Pepper
Instructions
In a large soup pot brown the ground beef in oil, then drain once the meat is cooked. Drain the beans that have soaked overnight or you’ve prepared with the quick method, and add to the soup pot. Add the remaining ingredients to the pot, bring it to a boil, then reduce the heat and simmer for 30 mins.
White this is cooking prepare your canning supplies – sterilize your jars, the lids and rings, which I do in my dishwasher and then keep there so they stay warm until ready to use.
With a slotted spoon, halfway fill each jar with the soup goodies – this way you get an even amount of goodies in each jar. Then take a ladle and fill the jars with the remaining soup liquids, leaving a 1″ head space.
Wipe edges of jar rims clean, place a sterilized lid on top, and hand tighten it close with a ring. Place each jar on top of the rack inside the canner, seal, and pressure can at 10lbs pressure for 90 minutes. Once done carefully remove the canner from the heat and let the pressure release on its own – mine takes 30 minutes. Then open the canner lid, remove the jars and place them on a kitchen towel to cool. And there you have it – pretty easy and straight forward.