How to Harvest and Prep Black Beans for Storage
Harvest and Prep Black Beans – Drying, Canning or Freezing
BLACK BEANS – How to Harvest and Prep Black Beans for Storage. I’ve been gardening and growing my own fruits and vegetables for over 30 years and I have NEVER grown beans. Well I take that back, I did one year and forgot about them until it was too late. So that doesn’t count. Not one who’s too fond of beans as a side dish, I never had any desire to grow them.
But with today’s economy and the hubs talking about the next Armageddon (well not really – but he does think something big’s coming and WE NEED TO BE PREPARED), I decided to give it a go. And wouldn’t you know it – every single bean seed planted sprouted and produced. I wish I had this good of a return with the rest of the seeds I planted – like squash, beets, carrots, sigh. But oh well – no worries. One can live on rice and beans alone if they had to.
Threshing The Seeds – Yikes
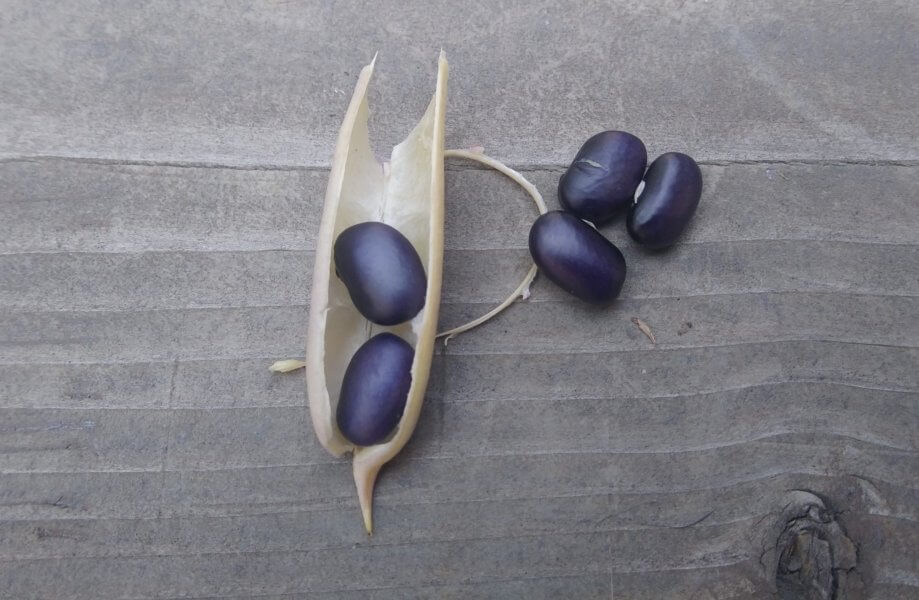
So the green beans were picked earlier as well as the yellows, but these black ones were definately the winner. I planted a good 25 foot row and my first pickings filled a huge bag. And as they sat on my kitchen table, still in their pods, I seriously dreaded the thought of threshing the seeds. But my promise to myself this year was to not let any grown foods go to waste because of neglect. So I did not put off till tomorrow what I could easily do today.
And so I dove in !! Needless to say it took 2 1/2 hours to remove those bad boys with a return of 2.11 pounds. This was really kind of discouraging and made me not want to ever grow beans again. That was until I talked to my gardener friend Debbie – who btw knows everything about anything when it comes to “all things growing” and always has some great useful tips. And she told me a little secret to make it easier. She puts her bean pods in a box on her porch, lets them sit for a few days, and then every time she walks by them she does a little dance on them. The dried shells open and some beans falls out – gives the box a little shake and removes the fallen beans. Viola !! Will definitely be trying this on the next batch.
How to Harvest and Prep Black Beans for Storage – Drying, Canning, Freezing Methods
So now what to do with all these beans? The hubs asked if we were having beans for dinner (mind you this was after spending 2 1/2 hours threshing them) and I said a big NO !! We’re going to just look at them for a while – way to much work and they’re just so pretty. Well I gave in and decided to process/store them like a normal person.
As there are a few ways to store the beans, I chose to just let them sit out and dry for a week, and then put them in a vacuum sealed bag. But there are other ways to store them long term. Keep reading and choose which one suits your situation.
If these little guys are stored properly they should be good for many years in your pantry. Just keep in mind the longer they sit on your shelf the longer they take to cook. Some have said that if they sit on a shelf for more than a year, you can make them softer by adding a 1/4 tsp of baking soda to each pound of beans while you’re cooking them. NOTE: this will also decrease the nutritional contents of the beans. Just be aware.
Drying for Storage
PLASTIC BAGS OR JAR STORAGE – Once you’re ready to harvest your black beans, pull up the plants when the pods have turned yellow. You can hang them upside until the pods have dried and the beans have become hard. Then break open each pod and remove the many seeds. Place them on a cookie sheet for several days which should be ample time for them to dry out. Dried beans can be stored in either a sealed plastic bag, a Mason jar with a tight screw top, or an airtight container. Or if you’re looking to keep them long term, you can store them in Mylar bags or #10 cans with oxygen absorbers. These will then keep for up to 10 years.
Pressure Canning for Storage
PRESSURE CANNING STORAGE – 2 Methods for Soaking Beans – OVERNIGHT SOAK OR QUICK SOAK METHOD
First – sort through the beans and pick out any damaged ones or stones. Rinse them well, place them in a large pot and add enough water to cover 2″ above the dried beans. Overnight Soak – cover and soak the beans in a cool area overnight, or for at least 12 hours. If you want to speed up the soaking process, you can use the Quick Soak method – bring a large pot to a boil, add the dried beans, boil for 2 minutes, remove the pot from the heat and let the beans soak for 1 hour.
Now that the black beans have been soaked, next is Cooking the Beans. So which ever soaking method you used: drain the soaked beans, rinse them and the pot well, add the beans back into the pot, and then cover the beans with water (at least 2″ above the soaked beans). Boil the beans, then reduce the heat and cook for 30 minutes.
Your cooked beans will swell a bit but will still be a tad hard. But don’t worry as they will soften up once they finish cooking in the pressure canner. Fill your jars with the beans and add some of the water used when cooking them, leaving a 1″ headspace. Process pint jars of dried beans for 75 minutes at 10 pounds of pressure, or quart jars for 90 minutes at 10 pounds of pressure.
Freezing for Storage
FROZEN STORAGE – soak the beans overnight or quick soak them for an hour (as described above). Rinse them off and place soaked beans in a pot, adding enough water to completely cover them PLUS an additional 2″, and simmer for 1 hour. Drain, cool them off by rinsing them, and then completely drain again. Place them in a resealable freezer bag or a freezer safe container. They will keep in the freezer for 6 months.
Well there you have it. And as you can see, neither of the storing options are hard. You just have to decide which method suits your storing needs. Good luck and happy canning.