Mexican Corn Canning Recipe
Makes 10 Pints – Easy Corn Canning Recipe For Beginners
Mexican Corn Canning Recipe. Now that your corn stalks have produced hundreds of ears it’s time to get creative with the storing process. You can freeze the cobs whole or halved, remove the kernels and freeze them, make creamed corn and can it, or just can the kernels in water – which in my humble opinion is plain and boring. But if you want to add a bit of a zip to your canned corn – make it Mexican style with onion and peppers … yes that means adding a couple hot peppers to the mix. It’s a side dish with a punch, depending how much of a kick you want.
So check it out – this Mexican Corn Canning Recipe was so simple to make, even a beginner canner can do it. I will say the only time consuming part was prepping the corn – needed to be shucked, blanched, dipped in cold water and then the kernels removed. But as tedious as it was – the finished product was well worth it. Enjoy 🙂
If you grow your own vegetables, grow your own fruit, or raise your own livestock, then I’m sure you already know of the rewards and benefits of having homegrown food at your fingertips. But what if you’re just getting started and are looking for ways to preserve every bit of produce you’ve toiled over the past spring, summer, and fall? If this is you (and it was me) then you have to check out this easy to make Mexican Corn Canning Recipe. It’s so easy even a beginner canner will nail it.
PREPARE THE INGREDIENTS, FILL THE JARS, PRESSURE COOK, AND WAIT FOR THE PINGS !
First things first – gotta get those corn ears ready. Shuck all the corn, and make sure you save the husks and scraps for the compost. Next – halfway fill a big soup pot with water and bring it to a boil, Then lower the heat. You can either drop the corn ears into the hot water whole or snapped in half, which I find they’re much easier to handle when it comes to removing the kernels. Keep the corn in the hot water for 3 minutes. Remove with tongs and place directly in a bowl of cold water filled with ice – this stops the cooking process and makes handling the corn easier. Then stand them up and slice off the corn. It’s going to be a messy job as corn tends to squirt when cut, so make sure your working space is clear.
And now that your corn is prepped – let’s make the mix!!
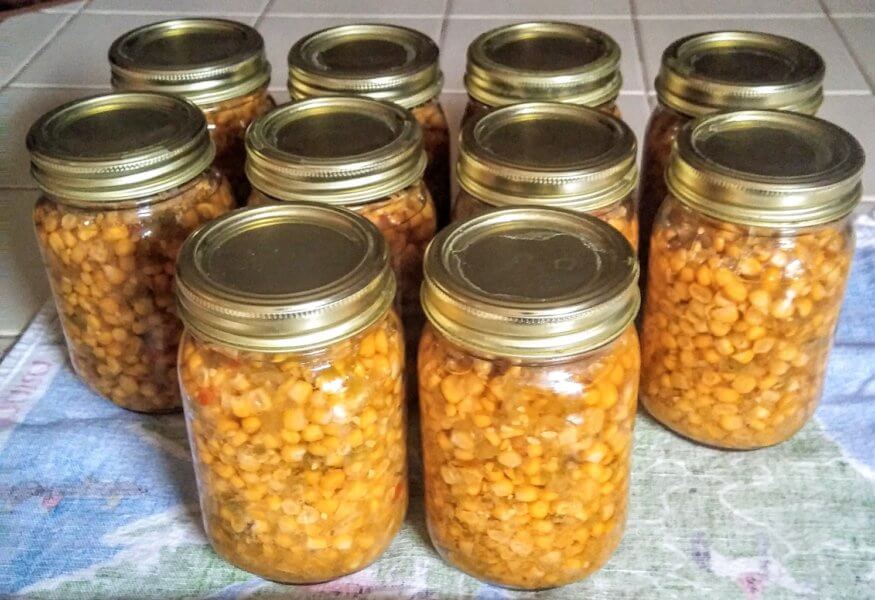
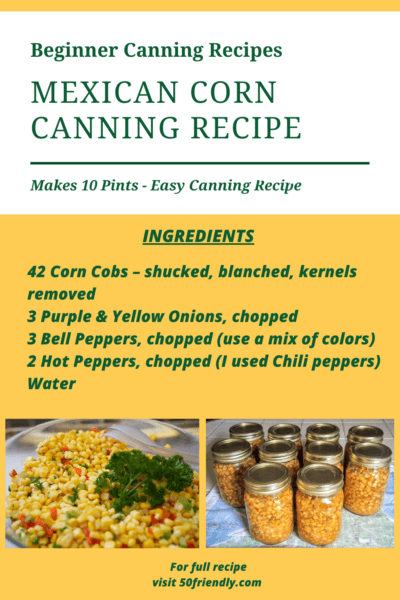
Mexican Corn Canning Recipe – makes 10 pints
thank you chickensoupforthebowl for the delicious recipe
Ingredients
42 Corn Cobs – shucked, blanched, kernels removed
3 Purple Onions, chopped
3 Bell Peppers, chopped (use a mix of colors)
2 Hot Peppers, chopped (I used Chili peppers)
Water
Salt, optional
Instructions
Prepare your canning supplies – sterilize your jars, the lids and rings, which I do in my dishwasher and then keep there so they stay warm until ready to use. I also add the required water to my pressure canner, get the water to a nice hot temperature and ready for the jars
In a large soup pot or large bowl, add the cut corn kernels, the onions and peppers – mixing everything together.
Scoop the mixed veggies out with a slotted spoon and fill the jars – tapping them down so they’re in there good but not jammed packed. Make sure to leave a 1″ headspace. Fill the jar and veggie mix with boiling water, not going past the 1″ headspace.
Wipe edges of jar rims clean, place a sterilized lid on top, and hand tighten it close with a ring. Place each jar on top of the rack inside the canner, seal, and pressure can the PINTS at 10lbs pressure for 85 minutes. If you’ve filled QUART JARS – pressure can at 10lbs pressure for 90 minutes. Once done carefully remove the canner from the heat and let the pressure release on its own – mine takes 30 minutes. Then open the canner lid, remove the jars and place them on a kitchen towel to cool. And there you have it – pretty easy and straight forward.